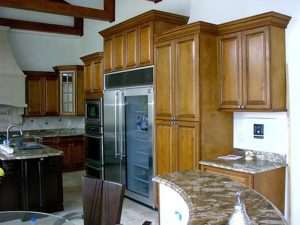
Cabinet refinishing is an ideal solution for homeowners seeking to update the look of their kitchen without undergoing a major renovation. Cabinet Refinishing San Jose CA involves reusing your existing cabinet doors and drawer fronts while changing the color or finish.
This process is much less disruptive than a full kitchen remodel and can be completed in a shorter timeframe.
Getting the best results from your cabinet refinishing or painting project requires careful preparation. Proper prep ensures that your paint adheres correctly, minimizes imperfections, and gives your cabinets a professional-looking makeover that lasts for years.
Begin by emptying your cabinets and removing all hardware. This will give you a clean canvas to work with and prevent any accidental paint spills or splatters from damaging your belongings. Once everything is cleared out, start by cleaning the surfaces of your cabinets with a mild kitchen cleaner and a damp cloth. Once the surface is dry, lightly sand all surfaces for smoothness. After sanding, vacuum or use a tack cloth to remove any remaining dust. Finally, prime the cabinets with a primer that is appropriate for your cabinet material. Let the primer dry according to the manufacturer’s instructions.
Once the primer is dry, you’re ready to begin staining your cabinets or painting them. Choose a color or finish that suits your style and budget. You can also opt to add a protective sealant, which will enhance durability and longevity.
Before staining your cabinets, you’ll need to lightly sand the surfaces for a smooth base. Afterwards, you can apply a thin coat of oil-based wood stain and allow it to dry. Once the stain is dry, you can reinstall your cabinet doors and drawers and enjoy your new look!
The final step in the cabinet refinishing process is to seal the surface with a waterproof protective sealant. This will help protect your cabinets from moisture and dirt and keep them looking their best for years to come.
Cabinet refinishing is an affordable way to revitalize your kitchen. It is less expensive than refacing or replacing your cabinets, and it allows you to customize the style to suit your personal taste. It’s important to prepare properly before beginning the refinishing process, and hiring professionals can save you time and stress while providing you with quality results.
Stripping
The stripping process involves removing any existing finishes from surfaces before applying new coatings. This is a crucial step in the preparation of interiors, particularly for painting and staining, as it ensures that the new materials are applied evenly and smoothly to achieve a quality finish. There are many different stripping methods, including chemical, thermal, and mechanical. Choosing the right stripper for your project will help you achieve the best results.
While it may seem like a simple task, stripping is actually quite complicated. It involves a careful and thorough cleansing of the wooden surfaces, ensuring that they are free of any grease or grime. Once the cabinets have been properly cleaned, they can be stripped using a variety of chemicals and then sanded before the application of the new coatings.
After the cabinet boxes are stripped, sanded, and prepared for paint or stain, they can be painted in your chosen color. It is important to let the paint dry between coats for a smooth and durable result. In addition to protecting your cabinets, paint will also add value to your home. It is important to choose a high-quality paint that will stand up to frequent use and washing.
Refinishing is an ideal choice for homeowners looking to refresh their cabinets without the hassle of a full renovation. This process is similar to refacing, but instead of replacing the entire cabinet door and panel, craftsmen will upgrade the doors and drawer fronts to the customer’s specifications.
Cabinet refinishing is an excellent option for wood and engineered wood cabinetry. It is less expensive and quicker than refacing, but it still provides an entirely new look to the cabinetry. It is also an excellent option for those who have existing cabinetry that is structurally sound, but want to change the color or style of their cabinets.
If you are thinking about refinishing your cabinets, we recommend that you contact one of our experts for more information. They will be able to answer any questions you may have and provide you with an estimate for your project.
Repairs
Cabinet refinishing can be an effective and cost-effective solution to updating your cabinets. Refinishing is best for cabinets made of wood or engineered wood such as medium-density fiberboard (MDF). The process involves stripping the doors and drawer fronts, repairing any imperfections, and then staining or painting them.
Our technicians can also help you change your cabinet color, and they begin the process by stripping the existing finish and sanding each surface. They work carefully to preserve as much of the original look as possible, and then apply a few coats of primer. They sand again after each coat, creating a smooth surface that will be ready for your new color or stain.
After the primer is dry, we repair any dents or scratches that were missed during the stripping process. We use wood touch-up markers to fill in small blemishes and scratches, and we sand the repaired areas smooth so they blend with the surrounding surface. We may also have to apply a wood filler if the damage is more significant. For deeper dents or holes, we can use a two-part wood filler that dries hard, allowing us to create a strong and durable repair that won’t be easily damaged in the future.
Then, we can apply your choice of stain or paint. If your cabinets are stained, our professionals can also use a protective sealant to enhance durability and provide extra protection against wear and tear. This step is a crucial part of the process, and our skilled technicians will work to ensure that your finished product looks flawless.
The process of refinishing your cabinets can take anywhere from several days to a few weeks, depending on the size of your kitchen and the number of cabinets. We will work carefully to minimize disruption in your home, and we can set up a temporary kitchen space if necessary. To learn more about our cabinet refinishing services or to schedule an appointment, contact us today! We proudly serve homeowners in Dallas, University Park, Lancaster, Rose Hill, and the surrounding communities.
Painting
Painting your cabinets can be a very time-consuming and labor intensive project. However, if you choose to take this on yourself, it is important that you take the proper steps to ensure your paint job turns out beautifully and looks as good as possible.
Begin by thoroughly cleaning all cabinet surfaces. Use a mild cleaner specifically formulated for wood cabinet surfaces to remove grease, dirt and grime. Make sure to clean especially well around handles, knobs and pulls where grease buildup is common. Allow all surface areas to dry thoroughly before continuing.
Once the cabinets are clean, it is a good idea to patch any holes, cracks or imperfections with spackle and/or wood filler. Once these have dried, sand the repaired areas again to ensure that they are smooth and ready for new paint. Again, be sure to sand the entire cabinet surface, paying special attention to corners, edges and decorative elements.
After sanding, wipe the surfaces down with a damp lint-free cloth to remove any residue and dust. Next, apply a coat of high-quality primer. There are many different primers available and it is important to choose the right one for your project. Some primers are better at bonding to existing finishes and some are better at preventing bleed through.
A good primer will also help to ensure that your final paint color adheres to the cabinet surface and helps the new finish last longer. Lastly, once the primer has dried, you can begin to paint your cabinets. Again, it is a good idea to apply several thin and even coats of paint in order to achieve the best results. Using a brush for detailed areas and a sprayer for larger surfaces is ideal.
Once the cabinet painting is completed, a clear protective finish or polyurethane can be applied to seal and protect the finished work. After a few hours, the cabinets are ready to be reattached to their hinges and hardware. Be sure to label any doors, drawers or shelves that have been painted and keep all hardware in a safe place for reattachment later on.